Back to basics: Nature Photography
Back to basics: Nature Photography
Text and photos by Heather Cline
 
Juvenile Antelope Squirrel, Carrizo Plains National Monument |
I was recently gifted a vintage film camera from my husband's boss. It was so much fun to start going through all the camera settings, remembering what it was like to use this fine tool before the digital age. It also made me reflect on the fundamentals of photography. While modern tools have introduced faster shutter speeds, higher ISOs, and the ability to recover from certain field mishaps, there’s still immense value in starting with—or revisiting—these core principles.
Returning to the essentials of nature photography means revisiting the core principles that shape compelling imagery. This involves gaining a solid grasp of fundamental equipment, mastering the exposure triangle, and honing an eye for composition—an art of thoughtfully arranging elements within the frame to craft visually striking and impactful photographs.
Equipment
Camera: Selecting a camera for nature photography involves considering features that enhance your ability to capture stunning images in various conditions. Here are key factors to keep in mind:
- Autofocus: Fast, accurate autofocus is essential for capturing moving subjects, especially wildlife. Look for advanced tracking features like eye detection.
- Burst Mode: High-speed continuous shooting helps capture fleeting moments, like birds in flight. A high frames-per-second (fps) rate and a large buffer improve success.
- Low-Light Performance: Since nature photography often occurs at dawn, dusk, or in shaded environments, a camera with strong low-light capabilities ensures sharp images.
- Weather Sealing: Outdoor photography exposes your gear to the elements, so weather-sealed cameras protect against rain, dust, and other harsh conditions.
- Lens Selection: A variety of lenses expand your creative possibilities. Telephoto lenses are great for distant subjects, while wide-angle lenses work well for landscapes.
- Sensor Size: Larger sensors provide better image quality and low-light performance. Full-frame sensors are often favored for professional wildlife photography.
- DSLR vs. Mirrorless: Both offer excellent image quality, but mirrorless cameras are lighter, more compact, and typically have superior autofocus.
- Resolution: A resolution of 30-50MP allows for cropping without sacrificing detail, making it ideal for wildlife photography.
|
|

Lenses: Selecting the ideal lens can make a significant impact on your ability to capture stunning nature shots. Here are key factors to consider:
- Aperture: A wider aperture (low f-number, e.g., f/2.8) lets in more light, ideal for low-light conditions and creating a shallow depth of field to isolate subjects. Smaller apertures (high f-number, e.g., f/8 or above) increase depth of field, making them perfect for landscapes where everything should remain in focus.
- Autofocus Speed: Fast and precise autofocus is crucial for wildlife photography, ensuring you can lock onto moving subjects and capture sharp images with ease.
- Image Stabilization: Built-in stabilization (IS or VR) minimizes camera shake, especially when using telephoto lenses or shooting handheld in low-light environments, leading to crisper shots.
For landscape photography, wide-angle lenses (10-35mm) are excellent for capturing sweeping scenes. For wildlife photography, telephoto lenses (70-300mm or longer) allow you to photograph distant subjects with clarity and detail.

Sunstar and cactus at sunset, Organ Pipe Cactus National Monument
Tripod/Monopod: When deciding between a tripod and a monopod, consider stability, portability, and speed, depending on your shooting style and environment.
- Stability: A tripod offers superior stability, making it ideal for long exposures and minimizing camera shake. A monopod provides moderate support but is less stable for extended exposure times.
- Portability: Monopods are lightweight and compact, making them easy to carry through dense terrain. Tripods, while sturdier, can be bulkier and less practical for quick movement.
- Speed: A monopod allows for fast adjustments, perfect for tracking wildlife or capturing fleeting moments. Tripods take longer to set up and reposition, which may limit spontaneous shooting.
If you're shooting landscapes or need maximum stability, a tripod is the better choice. If mobility and speed are priorities—especially for wildlife photography—a monopod is the more practical option

Curved-bill Thrasher, Tucson Arizona
Filters: Selecting the right filters enhances image quality and creative possibilities in nature photography. When choosing filters, prioritize lens diameter to ensure a proper fit and avoid vignetting. Additionally, opt for high-quality filters to maintain image sharpness and clarity. Common and useful filters include:
- Neutral Density (ND) Filters: Reduce light intake, allowing for longer exposures without overexposure, perfect for capturing smooth waterfalls or motion blur.
- Polarizers: Cut glare and reflections while enhancing contrast and saturation, ideal for water surfaces and vibrant landscapes.
- Graduated Neutral Density (GND) Filters: Balance exposure between bright skies and darker foregrounds, ensuring well-exposed landscape shots.

Desert Cottontail at sunrise, Organ Pipe Cactus National Monument
Flash: While flash isn't always necessary for nature photography, it can be useful for capturing details in wildflowers, mushrooms, and other stationary subjects in low light. If you choose to incorporate flash, consider the following:
- Compatibility: Ensure the flash works with your camera brand and model.
- Speed & Power: High-speed sync allows flash use with fast shutter speeds, and quick recharge times help capture multiple shots efficiently—especially in wildlife photography.
- TTL vs. Manual Mode: TTL (automatic) adapts to lighting conditions, while manual mode provides control for precise adjustments.
- Bounce Flash: A rotating, tilting flash head lets you bounce light off surfaces for softer, more natural illumination.
- Off-Camera Flash: For more creative lighting, use a remote trigger and light stand to position the flash away from the camera.
- Light Modifiers: Soft boxes and diffusers help soften flash intensity for more natural-looking results.
A note on ethics: Bright flashes may disturb wildlife, so consider lower power settings or avoid using a flash when photographing animals.

Floral portrait, UC Berkeley Botanical Garden
Exposure Triangle
The exposure triangle is comprised of Aperture, Shutter Speed and ISO.
Aperture: Think of aperture as a window that controls how much light enters the camera. While the mechanics behind it are complex, the concept is simple—adjusting the aperture lets in more or less light, much like opening or closing curtain Aperture serves two key functions: exposure and depth of field:
- Exposure Control: It determines how much light reaches the sensor, working alongside shutter speed and ISO to achieve a balanced exposure.
- Depth of Field: Aperture influences sharpness in front of and behind your subject, allowing for creative control over focus.
- Deep depth of field (higher f-number like f/8 or f/11) keeps everything sharp—perfect for landscapes.
- Shallow depth of field (lower f-number like f/2.8 or f/4) isolates the subject, great for portraits.
- Aperture is measured in f-stops (e.g., f/1.4, f/2.8, f/8). The numbers seem counterintuitive—a smaller f-number means a wider aperture, allowing more light in, while a larger f-number means a smaller aperture, reducing light intake. Each lens has specific aperture limits, affecting how much light and depth control you have.
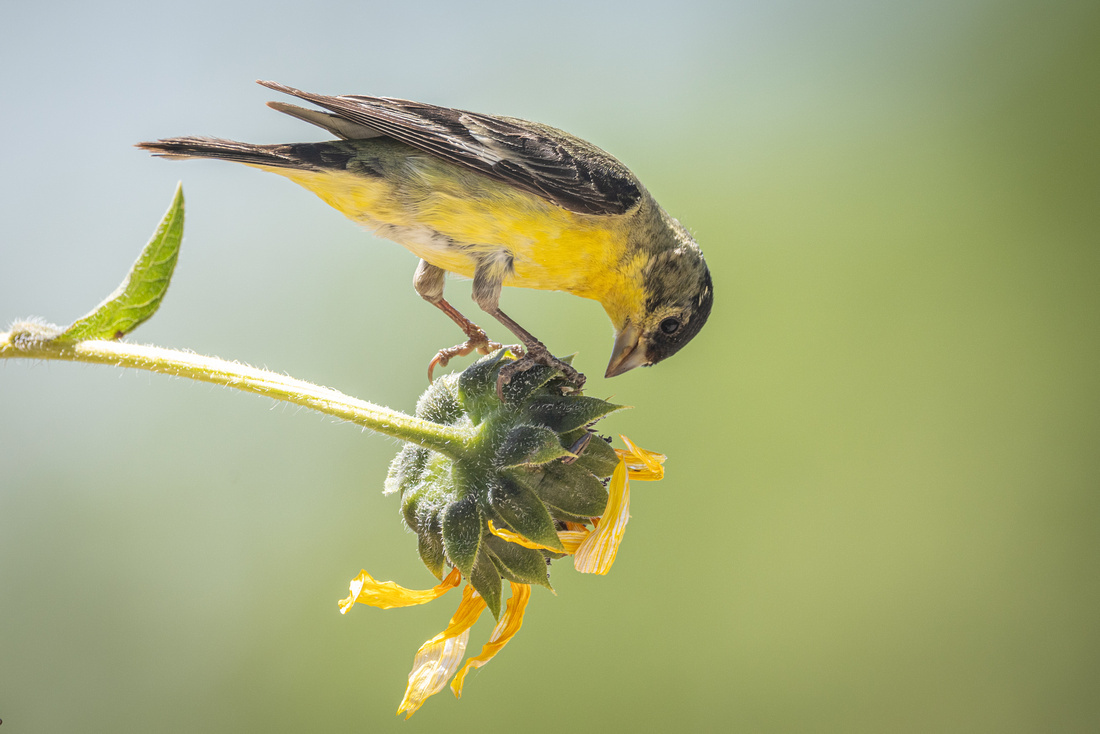
Lesser Goldfinch, Tucson Arizona
Shutter Speed
- Shutter speed is a measure of how long the camera's shutter is open when you take a photograph. A good analogy is shutters on a window that control how much light can be let in. Before digital photography, shutter speed dictated how long the film was exposed to light. The longer (aka: slower) the shutter speed, more light hit the film, resulting in lighter images. In contrast, the shorter (aka: faster) the shutter speed, less light hit the film, resulting in darker images. Today, shutter speed refers to how long light is exposed to the sensor in your digital camera, but the same rules apply. Shutter speed is measured in seconds, or fractions of seconds.
- Aperture and shutter speed work together. The aperture determines the amount of light that’s coming through the lens, while the shutter determines the length of time the sensor will be exposed to that light.
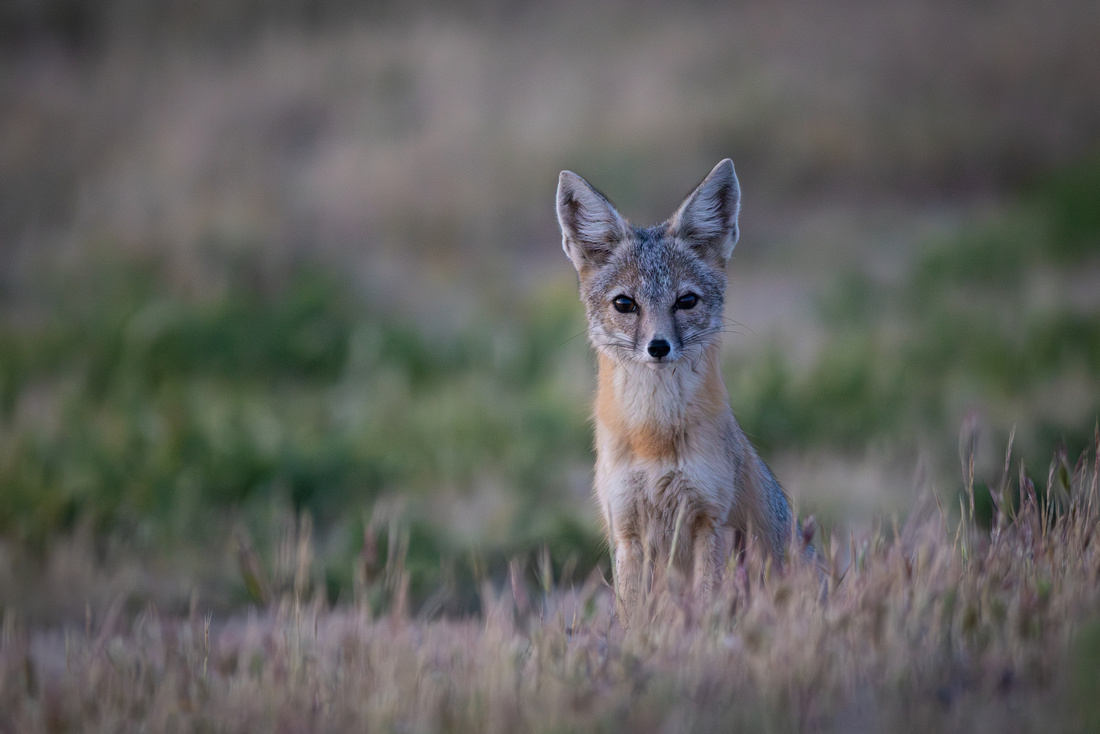
San Joaquin Kit Fox, Carrizo Plains National Monument
ISO
- ISO is essentially the film or digital camera's sensitivity to light. The higher the ISO, the more sensitive it is to light, and therefore less light is needed to produce a properly exposed image. In contrast, the lower the ISO, the less sensitive it is to light, requiring more light. What does ISO do?
- ISO doesn't really control anything in terms of creativity, such as aperture controlling depth of field and shutter speed controlling motion. What ISO does is enable you to change the aperture and/or shutter speed. Adjusting ISO to allow for a faster shutter speed is probably the most common reasons to do it. For example, if you want to capture a bird in flight, a fast shutter speed is needed, not fast like 1/100th of a second - fast like 1/1000th of a second.
- When should you change the ISO? For the most part, you should set the ISO at the lowest native ISO for your camera (likely 100) and leave it, unless. . .
- You want to freeze action (wildlife, sports, etc.)
- You are shooting at night and want to capture pinpoint stars, such as the Milky Way
- Trade-offs: With increased ISO comes increased grain in the image. Newer cameras are getting better and better, but there is still a trade-off to get that increased sensitivity to light just as there was with higher ISO film. So - when you can shoot at lower shutter speeds, do so, but don't be afraid to turn it up if it means getting the shot.

Antelope Slot Canyon, Page Arizona
Creativity
Once you have your tools and you know how to use them to create technically good images, you can focus your attention on the fun stuff like composition, lighting and storytelling.
Composition: Modern cameras handle many settings for you—exposure, depth of field, shutter speed, white balance, and focus. But one thing they can't do is compose your image. Composition—how elements are arranged within the frame—is one of the most important aspects of photography. There are many compositional rules you can use to improve your images. For an in-depth overview of compositional rules to try, check out my blog on 19 compositional rules to try.

Spiny-tailed Iguana, Tucson Arizona
Light is one of the most essential elements in photography. Natural light plays a crucial role in shaping the look and feel of an image. It consists of three key components: direction, quality, and color temperature.
- Direction:
- Backlight – Light comes from behind the subject, creating striking silhouettes or enhancing textures.
- Sidelight – Light from the side adds depth and accentuates textures.
- Frontlight – Light directly on the subject provides even illumination and sharp detail.
- Quality:
- Soft light – Diffused light (like on cloudy days) produces gentle shadows and even illumination.
- Hard light – Direct sunlight creates strong shadows and bold contrast.
- Color Temperature:
- Light varies throughout the day, affecting the overall tone of an image.
- Golden hour (after sunrise and before sunset) produces warm, soft tones.
- Blue hour (before sunrise and after sunset) creates cool, dramatic hues.

Plant Detail, UC Berkeley Botanical Garden
Storytelling: When starting out in nature photography, capturing a well-composed, properly exposed, and sharp image feels like a major achievement—and rightfully so. However, over time, especially when photographing a subject you’ve captured before, you’ll likely crave something more—an image that goes beyond a simple portrait. Moments of unique behavior or interactions with other wildlife add depth and storytelling, transforming a good shot into an extraordinary one.

Osprey with dinner, Page Springs Arizona
Nature photography is all about mastering the essentials, refining your technique, and embracing creativity. With the right equipment, a solid understanding of light and exposure, and a keen eye for composition, you can capture images that go beyond technical excellence and truly tell a story. Whether you're photographing breathtaking landscapes or documenting wildlife in action, every shot is an opportunity to create something meaningful.
