Night photography part three: Light painting
| If you have been following this blog post series, you have read about how to photograph the stars and Milky Way, and how to photograph star trails. In this third and final post, you will learn about light painting. Light painting is my favorite form of night photography, which is why I saved it for last! |
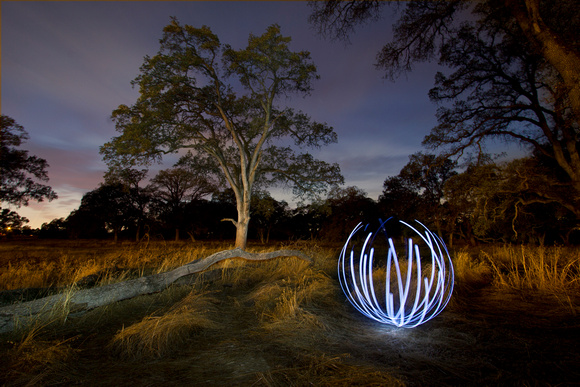
Broken orb and light painting, Folsom California - 16 mm, ISO: 100, F11 @ 305 seconds. This is one exposure. I created the orb by swinging battery operated led lights vertically while spinning in a circle very slowly. A broken orb is very difficult to accomplish because you have to manually turn the lights on in the downswing then back off again on the way back up. I had to work quickly so that I could also paint the scene with a flashlight. |
| I covered several topics to help you get started with night photography in my first two posts. If you haven’t already read these, you might want to check these out. I’ll refrain from covering them again in this post so we can focus on the unique aspects of light painting. |
The Racetrack, Death Valley National Park, California - 21 mm, ISO: 400, F8 @ 311 seconds. This was a straight shot using a simple flashlight to paint the scene. |
|
What is Light Painting? If you think about it, you paint with light every time you take a photograph. You are just using a rather large light source that you cannot hold in your hand: the sun. The difference with nighttime light painting is that you can bring a variety of light sources with you. Self-supplied light allows you to execute two different types of images: light painting and light drawing. In light painting, you can control the intensity, color, direction, and distribution of the light. In light drawing, you can also use these light sources to create subjects in your photograph. |
Olmsted Point, Yosemite National Park, California - 35 mm, ISO: 200, F11 @ 129 seconds. This was created with a flashlight that I first used to create the crisscross pattern on the ground, then to paint the rock and tree. |
|
Light Painting Gear There is a wide variety of light painting tools on the market today, but you don’t have to buy any these to get started. If you have a flashlight, you're in good shape. Here are a few light tools I have and what I use them for:
The last three items on the list required a little DIY. I found a video tutorial on how to create an orb light. I’m not even going to attempt to duplicate because he did such a nice job explaining it. I created the light wand by taking a set of battery operated Christmas lights and taping them to a wooden dowel. I made sure to paint the dowel black first, and used electrical tape to secure the lights at equal distances along the dowel. The spark thrower was made by securing a wire rope to a kitchen whisk. You can use any metal “basket” to hold the steel wool and any rope you choose. I’ve seen people use dog leashes, ropes, etc. for these as well. |
Light waves and tree, Fair Oaks, California - 16 mm, ISO: 100, F8 @ 183 seconds. I used my homemade light wand to create the green light waves then a flashlight to light the tree from behind. Warning: when you run around with a light wand in the dark, you look like a ding-dong. |
|
Clothing When you are light painting or drawing, there is a decent chance you will be stepping into the shot. As long as you keep moving, you shouldn't show up in the final shot, but lighter clothing may show up as streaks across the image. To avoid this, dress in dark clothing. I also always cover myself head to toe when using the spark thrower. Those sparks hurt like a mother when they hit your skin. Plus, I like my hair – I want to keep it. |
Abandoned building, Ohpir, California - 16 mm, ISO: 100, F11 @ 548 seconds. This building is actually gone now. It was falling apart and had a ton of garbage inside when I shot it. This was a combination of several shots where I painted different parts of the interior and exterior using a flashlight and my camera's flash to make one complete image. |
|
Location considerations I’ve done light painting In National Parks, State parks, County Parks, in cities and in deserts, on roadways, and abandoned sites. The location you choose is entirely up to the subject matter that interests you. There are two factors I consider when choosing a site: my safety and respect for the area in which I am shooting. There is no risk of damaging the landscape with battery operated lights, but I am careful not to shine lights into moving vehicles. In fact, I try to cover them completely when I see a car to avoid distracting them. I avoid using the spark thrower where there is dry grass or vegetation and always carry water, just in case. I try to get in, work quietly, and get out without disruption. |
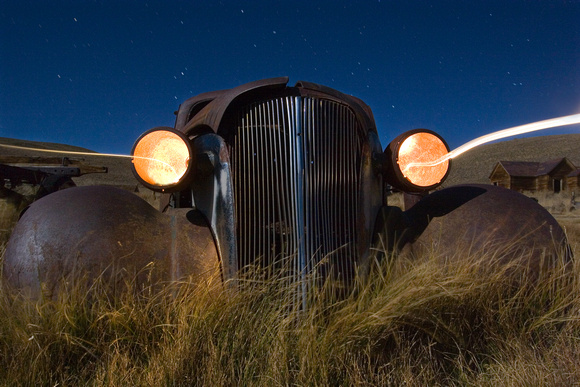
Old car, Bodie State Historic Park, California - 17 mm, ISO: 800, F8 @ 75 seconds. I shot this during a workshop and thought it would be neat to light up each headlamp. I hadn't though back then to turn the light off as I pulled it out of each light but I kind of like the streaks it created. |
|
Camera settings: There is no magic formula for the camera settings here, but I usually start with ISO 100, at F8 with my camera set to Bulb. Based on how long it takes me to paint the scene, I’ll know my approximate shutter speed and will adjust the ISO as needed to get the right exposure. If I am combining light painting of the foreground with the Milky Way or star trails in the sky, I will apply one set of camera settings for the sky and another for the foreground then merge in post process. Focal length: Any Why: A wide-angle lens has a larger frame of view that will allow you to capture more of the surrounding landscape, but a narrower focal length can isolate a scene and eliminate distractions. This one is purely up to your imagination and experimentation. ISO: 100 – 800 Why: I try to use the lowest possible ISO I can get away with. Lower ISO’s will yield finer grain which allows for better results when enlarging the image. If I’m able to paint a lot of light in, I’ll go with a lower ISO. But – if I’m finding it’s too low, I’ll bump it up until I get the exposure. Aperture: F8 – 11 Why: I use an aperture that allows as much light as possible while maintaining good depth of field. I do this because it can be difficult to take multiple shots at different apertures and merge in post process later. Shutter speed: Bulb setting – usually 30 – 180 seconds Why: I use the bulb setting, locking the shutter until I have completed my painting or drawing. If I am unable to complete all of the painting in one shot, I will paint sections then merge in post process. |
Fire orb on dock, Lake Tahoe, California - 16 mm, ISO: 200, F11 @ 258 seconds. I used the same technique here as I did with the fire orb above. I painted the dock with a flashlight. |
|
Post Processing Some shots are captured in one exposure as you have seen here. Others require taking one image for the sky and another for the foreground, then merging in Photoshop. Please see my stars and star trails posts for capturing sky exposures. If I am merging two or more images in Photoshop, I open the images in Lightroom, and make the standard adjustments such as spot removal, temperature, exposure, highlight/shadow, and contrast adjustments. Then I open both in Photoshop. Nearly all of the time, I simply use the rectangular marquee tool to select the sky on the sky image, feather ~200 pixels, copy, then paste as a new layer on the foreground image. I'll use the eraser tool as needed to clean up merged edges, but typically merging these images is pretty straightforward. I save as a TIFF then export out of Lightroom as needed. |
Broken orb on dock, Donner Lake, California - 15 mm, ISO: 250, F8 @ 66 seconds. I used the same technique here as I did with the broken orb above. It took 12 tries to get this right. This is two exposures; one for the Milky Way and another for the orb. |
| If you are interested in seeing more night photographs, please visit my After Dark Gallery. |
Abandoned shack, Lee Vining, California - 28 mm, ISO: 250, F11 @ 242 seconds. This was simply lit with a flashlight. |